
Your needs, this model
Does it fit your priorities?
Can I vacuum pack cool unfrozen liquids in heat-sealed chamber bags using preset vacuum levels?
Yes. The Pro-2500 documents liquid-filled chamber pouches, with liquid below the seal bar, clean headspace and its pressure-level controls. Follow the required bag and cooling instructions.
Explore this need in the finder →Can I use it as an external suction sealer for liquid-filled bags?
No. Its documented setup holds the pouch inside the chamber; the manual explicitly excludes embossed external-sealer bags. Chamber liquid capability does not establish an external route.
Explore this need in the finder →Does its fan qualify it for documented continuous-batch chamber use?
No. The operating procedure still requires about 20 seconds between bags with the lid open. Plan spaced cycles rather than assuming fan-cooled means uninterrupted sealing.
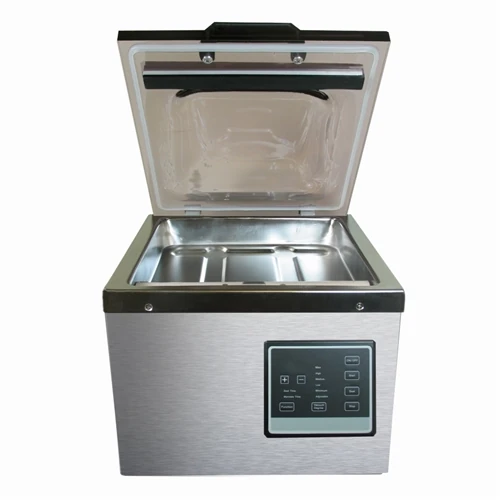
Explore this need in the finder →The Weston Pro-2500 65-1201-W is a chamber sealer for someone who wants to pack prepared portions, including liquids, in the type of pouch the machine is designed to use. Its useful distinction is pressure-based control: choose a vacuum level or adjust the pressure, then set the sealing time separately. This is a more involved routine than pressing a single automatic button on a small external sealer. It also needs counter space for a substantial chamber and its opening lid.
Choose it around chamber bags and actual food fit
The filled pouch lies inside the chamber, with its open end secured across the sealing bar. Weston explicitly requires chamber vacuum bags and excludes household storage bags and embossed bags intended for external suction sealers. That restriction matters if you already own a supply of textured rolls. Treat this purchase as a chamber-pouch system rather than assuming every vacuum bag you have will transfer to it.
The manual instructs you to leave one to two inches of headspace at the top and secure the bag with the holder latch. For liquids, the contents must not rise above the sealing bar. You therefore need room for the filled food and the opening to lie correctly, not simply a nominal empty bag that can be pushed inside. Before ordering a particular size of pouch, confirm its fit with Weston for this exact model. The lid must close without forcing an oversized portion into the sealing area.
For soups and sauces, use cool portions and keep the sealing area clean. The documented liquid route does not turn the chamber into a receptacle for loose liquid: the food stays in its compatible bag. A splash or residue across the opening can prevent the layers from welding consistently.
Vacuum pressure and sealing time do different jobs
The Pro-2500 panel lists Max, High, Medium, Low, Minimum and an adjustable selection. The manual describes a vacuum-degree range from 23.5 to 29.5 inches of mercury, with plus and minus adjustment for the custom setting. These are the machine's documented control settings, not a guarantee of a particular result with every food or at every location.
Sealing time controls the heat-welding stage. Weston asks you to test bags and inspect the result: a good seal should look smooth and consistent without wrinkles or melted-through areas. If the bag melts through, reduce the time; if it has not welded properly, increase it and test again. The instructions use one-second changes. That setup work is worthwhile when you will repeatedly use a consistent bag supply, but it adds a learning step for someone expecting a permanently correct universal preset.
The Seal button can stop evacuation and move to sealing. The manual also describes a seal-only sequence involving Start followed immediately by Seal. Neither should be confused with a dedicated, repeatedly operated manual Pulse button. If that particular style of control is essential for delicate foods, compare the exact button routine before buying.
A fan does not eliminate the pause between bags
The internal fan runs while the unit is on, but the operating instructions still call for approximately 20 seconds of cooling between bags, with the lid open. Build that pause into a portioning session. You can use the interval to check the previous seal and prepare the next pouch rather than assuming the machine is ready for immediate repeated cycles.
When sealing finishes, the manual says the unit beeps three times and releases the vacuum so the lid can open. Do not force the lid during the cycle. Weston also notes that the lid is heavy. A comfortable, accessible working position matters for loading and opening it repeatedly; a tight overhead shelf or a distant counter corner can make the routine awkward even if the closed body fits.
Marinating stays inside the documented pouch routine
The separate marinate function uses repeated vacuum, hold and release cycles. The manual gives a nine- to 99-minute selection range in nine-minute cycles. Follow its bag placement and liquid-height instructions for that mode too. This is not evidence that an arbitrary rigid canister, Mason jar or external hose arrangement is approved.
The process also does not replace normal cold storage or cooking requirements. Vacuum packaging is a storage tool, not sterilization. Plan refrigerator or freezer space for perishable portions before making a large batch.
Ownership and alternatives
The Pro-2500 uses a grounded 120-volt household outlet. After unplugging and cooling, wipe the chamber, lid and outside as instructed, avoiding the vents and abrasive cleaners. Protect the sealing-bar tape from damage and moisture. The manual identifies the lid gasket and assembled sealing bar as service parts; its discussion of a maintenance kit should not be read as a promise that every replacement component is included in a retail box.
Choose this model when pressure-level selection and chamber-pouch liquid packing fit your routine and you can accommodate its loading and cooling steps. The Avid Armor USV32 is an alternative to compare for direct vacuum-time control and its separately documented pouch dimensions. The Anova Precision Chamber offers another level-based chamber workflow. For longer dry portions that cannot fit inside a chamber, a compatible external system such as the Avid Armor A100 Gen 2 addresses a different packaging problem. Choose the bag format and operating routine first, then the machine.
Key details at a glance
| Mechanism | chamber |
|---|---|
| Power and charging | Grounded 120 V, 60 Hz household outlet. The read English instructions do not establish a US wattage rating; the Mexico table is not substituted. |
| Operating interval | Five preset pressure levels plus an adjustable setting; documented pressure range 23.5–29.5 in Hg. Seal time is separately adjustable. About 20 seconds cooling between bags with lid open; fan operation is not continuous-duty permission. |
| Supplies and accessories | Use compatible chamber vacuum bags. The manual explicitly excludes household storage bags and embossed bags intended for external suction machines. Retail starter-bag count and maintenance-kit inclusion are not established by the current catalogue data. |
| Care and storage | Unplug and cool, wipe chamber, lid and housing, dry thoroughly. Avoid abrasive cleaners, moisture on seal-bar tape and spraying into vents. Never immerse. |
| Chamber vacuum adjustment | levels |
Use the exact model’s instructions for operating limits, supplied equipment and version differences.
Sources for this assessment
Find a process that fits your food.
Combine package type, moisture and essential conveniences, then read the operating limits.